 MISO
MISOSequencing tutorial
1. Logging in
You need to log in to MISO LIMS in order to make changes to any LIMS entities. Logging in lets MISO record any changes you make on entities you have access to.
If you are a new user, you will need
to contact helpdesk@oicr.on.ca so that they put you into the appropriate
Active Directory group, MISO_ROLE_INTERNAL.
Try to log in now:
- Click on http://miso.gsi.oicr.on.ca.
- Enter your username (e.g. jdoe) and password and click the Login button.
MISO uses the same username and password as your OICR email account.
If all goes well, you should see the MISO Dashboard and see a message at the top right: "Logged in as: jdoe".
2. Checking for unfulfilled orders
There are two types of orders in MISO - pool orders, and sequencing orders.
Pool orders indicate that a set of library aliquots are ready to be pooled and sequenced. Click Pool Orders in the navigation menu to view pool orders in MISO. This page is divided into three tabs:
- Outstanding: shows pool orders that require work
- Fulfilled: shows pool orders that have been completed
- Draft: shows pool orders that are not yet finalized
In addition to pooling requirements, a pool order may specify sequencing requirements. Fulfilling a pool order requires linking a pool to it, as well as a sequencing order if sequencing requirements are specified. Thus, a pool order can become a sequencing order.
Sequencing Orders indicate that a pool is ready to be sequenced. The Outstanding Sequencing Orders page is used to decide what needs to be sequenced.
Columns on this page will disappear if there are no entries (e.g., the Failed column will not be shown if there are no failed runs). When enough lanes have been sequenced, the row will disappear from the Outstanding Sequencing Orders page, but remain in the All Sequencing Orders page. Lanes currently being sequenced will be marked as in-progress and remain on the Outstanding page until the run transitions to Completed.
A pool can have many sequencing orders. Orders for the same platform and chemistry are summed when displayed on this page.
2.1 Scan pools into your inbox
First, scan the pools from the libraries team into your inbox for further work.
Boxes hold samples, libraries, library aliquots, and pools. They do not track reagents or primers. Boxes are separated into uses for different kinds of storage (e.g., tissue samples versus extracted DNA), but there is no check that items in a box match. Each box also has a size that includes the physical dimensions of the box as well as whether the box is compatible with the VisionMate scanner. Every position in the box is identified by a standard row letter + column number format (e.g., C05).
In this exercise, we are going to take samples/libraries/pools from the previous team/collaborator by scanning them out of the previous box and into a newly created 'inbox'.
If you haven't already created an inbox, create one now:
- From the navigation panel, choose Boxes.
- Click Add at the top right of the table.
- In the Create Boxes dialog, leave the Quantity at 1 and click Create.
- On the Create Box page, enter the following information:
- Alias:
XX Inbox, replacingXXwith your own initials. Record this alias in your worksheet.
- Description: a human description of the box purpose
gDNA ready for
library prep for <project>
. - Box Use: The contents of the box. Select an appropriate use for your entities.
Record the use in your worksheet.
- Box Size: Select
8x12 Storage (scannable).
- Alias:
- Click Save.
Upon clicking save, a graphic of the box will appear.
![]()
You can now fill the box with the samples, libraries, library aliquots, or pools that were made in previous steps. Collect the appropriate matrix tubes/barcodes now.
- Click on a position in the displayed Contents grid.
- Enter a matrix barcode into the Search box on the right and click Lookup. Normally a hand scanner would be used. You can also search for items by their name or alias
- Click Update Position.
- ⚠ The Save button at the top of the page does not work for individual positions, only for Box Information.
- Repeat for as many samples/libraries/library aliquots/pools as you want.
The table below the box diagram shows the position and information for the currently selected sample. If you would like to see all of the samples in the table, click the List all Box Contents button at the top right of the table.
In the lab, it is possible to use Options > Scan Box to use the plate scanner and update all positions at once, but that will not be covered in this tutorial.
Using Boxes
Boxes can be found either from the Sample or Library page or the Boxes page.
- On the Samples or Libraries page, search for one of your sample or library aliases and click on its alias to load the page.
- The Box and position is listed under Box Location in the Sample Information
or Library Information section. Click on the link to go to the Box (e.g.
PROJ_OUTBOX, A03).
Boxes can be used to store Samples, Libraries, Library Aliquots, and Pools and one box can store all four types.
3. Working with pool orders
To fulfill a pool order, a pool containing all of the specified library aliquots must be linked to the order. If the pool order specifies sequencing requirements, a sequencing order for the same pool with matching requirements must also be linked.
From the Edit Pool Order page, you can create a pool containing the required aliquots, or link an existing pool. If the pool order specifies sequencing requirements, there will also be options to create or link a sequencing order after a pool is linked.
3.1 Creating a pool from a pool order
- On the Pool Orders page, select the Outstanding tab and click the alias for the pool order that was created in the libraries tutorial.
- At the bottom of the Order Information section, click Create Pool.
- A dialog will appear to confirm the aliquots and proportions of the pool. Click Yes to continue.
- The next dialog allows you to enter pool information. Set the alias to the project's
short name followed by
_POOL_2(e.g.PROJ_POOL_2). Leave the other fields at their default values. - Click Save. The newly created pool will be linked to the pool order and options to create or link a sequencing order will appear.
3.2 Creating a sequencing order from a pool order
- Continuing from the Edit Pool Order page, at the bottom of the Order Information section, click the Create Sequencing Order button.
- In the dialog, enter a description for the sequencing order:
MISO tutorial order. - Click Save. The pool order will now be marked as Fulfilled and show that a sequencing order is linked.
4. Creating runs from scratch
MISO supports runs from Illumina, PacBio, Oxford Nanopore, and other sequencers, so the terms used for instrument runs and associated libraries are intentionally different from those used by the vendor. A MISO Run represents a sequencing run where the sequencer has been loaded and sequencing has begun. The Run Scanner can be configured to detect new Illumina, PacBio, and Oxford Nanopore runs and automatically create corresponding runs in MISO, while runs for other platforms must be created manually. A Sequencing Container is the link between the library information and the instrument Run, and contains one or more lanes. Each Illumina lane, PacBio SMRT cell, or Oxford Nanopore flow cell is loaded with exactly one Pool. Runs and Containers can be associated as soon as the Run and Container have both been created.
4.1 Create a Container
- On the Sequencing Containers page, select the Illumina platform and click the Add … button near the top left of the table. The text on this button will vary depending on the platform
- Select
Illumina HiSeq 2500from the dialog. - Select
HiSeq PE Flow Cell v4from the dialog. Only active (non-archived) models are available. -
Enter the name of your project as the serial number. Record the serial number in your worksheet.
- Click Save in the upper right corner of the page.
4.2 Create a Run
- On the Sequencing Runs page, select the Illumina platform and click the Add Illumina Run button near the top left corner of the table.
- Select D00331 (Illumina HiSeq 2500) from the sequencers list. Only active (non-retired) sequencers are available.
- Enter a unique and memorable Alias for your run. Record the alias in your worksheet.
- Select Sequencing Parameters
V4 2×101 -
In the Run Path field, enter
pathas the file path to the sequencer output. -
Check Paired End.
- Select Status
Running. Note that if MISO does not automatically detect runs from this sequencer, all status updates will have to be entered manually. - Enter a date into Start Date.
- Click Save in the upper right corner of the page.
- In the Flow Cell section, click the Add Flow Cell button.
- Enter the flow cell serial number of the container you created in exercise 4.1 and click the Add button.
5. Working with automatically created runs
This exercise looks at a run created by Run Scanner. If your site is not using Run Scanner, you should skip this exercise.
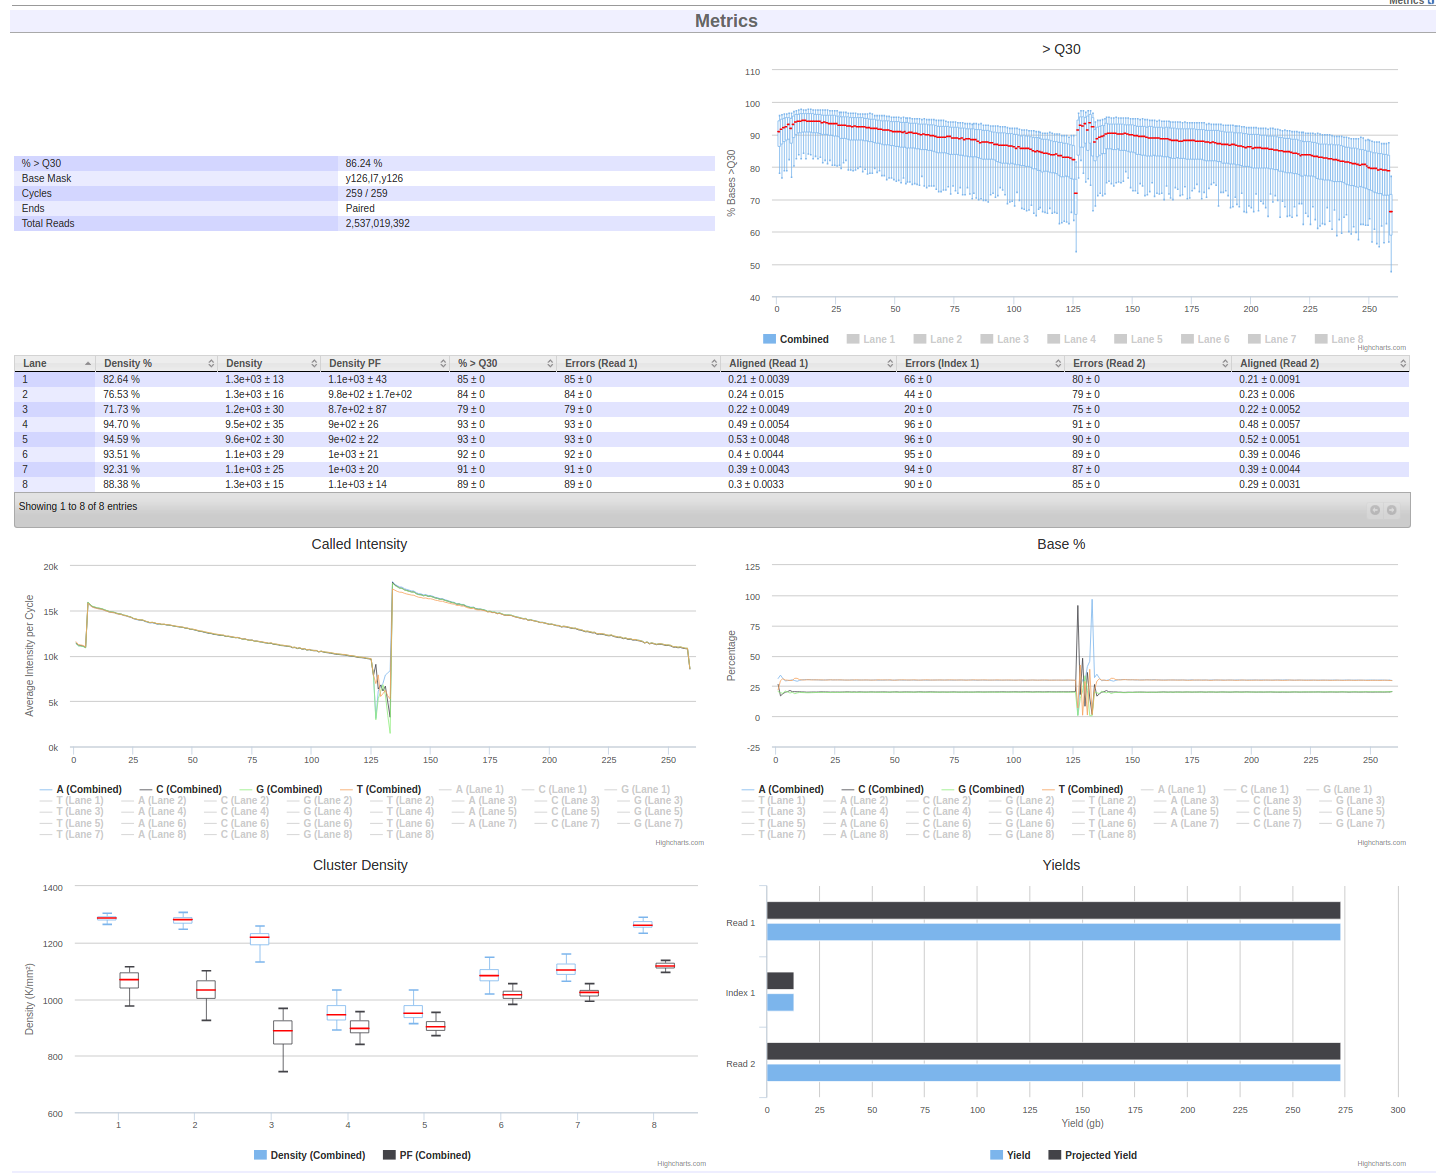
Shortly after an instrument begins imaging, MISO should detect it and create a Run. As sequencing continues, MISO will pull back information about the quality of the run similar to the on-instrument applications like SAV. This includes statistics like percent pass filter, the percent of bases with Qscores over 30, and cluster density.
- From the Sequencing Runs page, find the run
220120_A00469_0263_AH3YMFDSX3. Click on the run alias to go to the run page. - Scroll down to the Metrics section and examine the sequencing metrics for this run.
6. Adding pools to runs
The Run (representing an instrument run) is associated with Pools using a Sequencing Container.

6.1 Add a pool to a run
- On the page of the run you created in exercise 4.2, scroll down to the Lanes section.
- Check the box to select the first lane.
- Click Assign Pool from the toolbar.
- Search for the pool created by the libraries team that you scanned into your inbox in exercise 2.1. Try Outstanding Orders (Matched Chemistry).
- Click the pool from the list.
- Enter any number for the loading concentration and click
OK.
Now check on the sequencing order.
- Click on the Outstanding Sequencing Orders page and verify that the Running column now shows 1 for the pool you added to the run.
6.2 Mark a library as Low Quality
Not every library realises its full potential. After sequencing, specific libraries can be flagged as having low sequencing quality. The "Low Quality Sequencing" indicator causes any pool containing this library to be flagged, so that it can be checked before it is sequenced again.
- From the Libraries page, find one of your libraries and click the link.
- Check Low Quality Sequencing.
- Click Save.
Now if the Pool containing that Library is added to a Sequencing Container, it will be flagged.
- Go back to your Run page.
- Find your pool using the lanes table. It will be flagged with a red warning marker.
- Hover your mouse over the warning marker to see the full warning message.
6.3 Setting Per-Lane QCs
Sometimes a particular lane is bad or for other reasons should not be analysed. MISO allows setting a per-lane QC. Lane QCs indicate whether a lane should be considered for sequencing order fulfillment, and whether a lane should proceed to analysis.
- Go to your run page.
- In the Lanes section, check the first lane.
- Click Set QC from the toolbar.
- Pick
Failed: Other problem. This indicates that the sequencing order will not be fulfilled - more sequencing is required - and that analysis should be skipped. - Enter a description of the problem.
- Click Set.
7. Scanning libraries/pools into your outbox
Finally, update your outbox with your samples/libraries/pools to pass them on to the next team or to put them into storage.
If you haven't already created an outbox, create one now:
- From the navigation panel, choose Boxes.
- Click Add at the top right of the table.
- In the Create Boxes dialog, leave the Quantity at 1 and click Create.
- On the Create Box page, enter the following information:
- Alias:
XX Outbox, replacingXXwith your own initials. Record this name in your worksheet. - Description: enter a human description of the box purpose
- Box Use: The contents of the box. Select an appropriate use for your entities. Record the
use in your worksheet.
- Box Size: Select
8x12 Storage (scannable).
- Alias:
- Click Save.
Add each of the samples/libraries/pools that you created to the box.
8. Adding Service Records to Instruments
Each instrument can have one or more associated service records.
- From the main menu, click Instruments.
- Choose an individual instrument.
- Use the blue arrow to expand the Service Records section.
- Click the Add button at the top of the table.
- Fill in the form as follows:
- Title: a short description of the work (e.g.,
Remove gremlin from sequencer) - Description: a long description of the work (e.g.,
A gremlin was found outside
 of the terrible 80s movie. It had developed a taste for polymerase.
) - Serviced By: your name
- Service Date: the current date
- Title: a short description of the work (e.g.,
- Click Save.
Optionally, you can set an issue start time and mark the instrument as out of service. The instrument will be listed as out of service until an issue end time is added. If the instrument has multiple sequencing positions and only one is out of service, that can be specified by also selecting the position affected.
After saving, it is also possible to attach files to the record. Look under the Attachments heading.
9. Troubleshooting
- When instruments break down, how do you log failures into the system?
- Add a service record as in 8: Adding Service Records to Sequencers
- How do you assign single lane failures?
- It is possible to select one or more lanes on the Edit Run page and set a QC status to indicate whether the lane should be considered for sequencing order fulfillment, and whether the lane should be analysed.
- How do you assign QC status to individual libraries within a lane?
- A "run-library" refers to an individual library within a lane. Its QC status can be set using the controls on the Library Aliquots table on the Edit Run page.
- How do you fail flowcells? Or how does MISO detect failed runs?
- If MISO automatically detects runs from this sequencer, then in most cases MISO will automatically detect failed runs if the run has begun sequencing.
- If MISO does not automatically detect runs from this sequencer or you note that MISO
has not detected that the run has failed, then you must select the
Failedstatus on the Edit Run page, and enter a completion date. - If the pool contains a single library and you know that the library is of low enough quality that sequencing should not be attempted again, follow the steps to mark a library as Low Quality.
| < Libraries | Home | Checking Index Distance > |