 MISO
MISOWorking with Tables
Working with Tables
Creating and editing samples, libraries, library aliquots, pools, and orders are done on the bulk table pages, where you can quickly enter information into spreadsheet-like tables. This tutorial will help you get to know the features available on the bulk table pages.
1. Logging in
You need to log in to MISO LIMS in order to make changes to any LIMS entities. Logging in lets MISO record any changes you make on entities you have access to.
If you are a new user, you will need
to contact helpdesk@oicr.on.ca so that they put you into the appropriate
Active Directory group, MISO_ROLE_INTERNAL.
Try to log in now:
- Click on http://miso.gsi.oicr.on.ca.
- Enter your username (e.g. jdoe) and password and click the Login button.
MISO uses the same username and password as your OICR email account.
If all goes well, you should see the MISO Dashboard and see a message at the top right: "Logged in as: jdoe".
2. Quick Help
The Quick Help section at the top of the bulk tables page contains instructions for how to interact with multiple table cells at once.
- In the Preparation menu on the left sidebar, click on Libraries.
- At the top left of the Libraries table, click Receive.
- In the dialog box, enter:
- Aliquot Class: Select any option.
- Quantity: 5
- Click Receive.
- Click the Quick Help header at the top right of the page, under the save button.
- To close the Quick Help section, click again on the Quick Help header.
3. Copy & Paste
If you have a spreadsheet that already has the sample information and you need to enter this into MISO, copy-pasting is often the fastest way to do this.
- Open the Quick Help. Note which key combination your current computer uses to paste.
- Copy the items from the table below (do not copy the "Sample Type" cell).
- Click in the first row of the Sample Type column, and use the key combination to paste.
| Sample Type |
|---|
| GENOMIC |
| GENOMIC |
| GENOMIC |
| GENOMIC |
| GENOMIC |
4. Fill Many
Entering the same data in all rows can be done by using the fill handle. The fill handle is the square that appears at the bottom right corner of the cell you have selected. Enter the data in one cell, then you can fill in multiple cells by:
- double-clicking the fill handle to fill in all cells below.
- clicking the fill handle and dragging the mouse up or down through other cells to fill those cells with the initial value.
4.1 Fill Many: Drag (fills up or down)
- Select a project from the dropdown in the last row of the Project column.
- The cell will have a blue border with a blue square (the fill handle) in the bottom right corner. If you do not see the fill handle, click on another cell and then click again on the project cell.
- Click on the fill handle and hold the mouse button down as you drag up to the top row in the Project column.
Release the mouse button.
- The cells will all change to the same project.
4.2 Fill Many: Double-click (fills down)
- Clear all of the cells in the Project column by clicking each cell and clicking the Delete key on your keyboard.
- Select any project from the dropdown in the first row of the Project column.
- The cell will have a blue border with a blue square (the fill handle) in the bottom right corner. If you do not see the fill handle, click on another cell and then click again on the project cell.
- Double-click on the fill handle.
- The cells below it will all change to the same project.
Note: multiple columns can be filled at once.
You can test this out:
- Fill in values in the top row for the Tissue Origin, Tissue Type, Times Received, and Tube Number columns.
- Click the first row Tissue Origin cell, then press Shift, click the first row Tube Number cell, and release the
Shift key.
- All the cells between Tissue Origin and Tube Number will be selected.
- Double-click or drag down on the blue square in the bottom right corner of the Tube Number cell.
- All the cells in all the selected columns will change to contain the values from the first row.
4.3 Fill Many: Incrementing (fill down)
If the values in a column need to each be one greater than the value in the row before it, you can fill the column using the incremental fill down.
-
In the first two rows of the Matrix Barcode column, enter the following (substituting XX for your initials):
Matrix Barcode TEST_XX01 TEST_XX02 - In the Matrix Barcode column, click the cell in the first row, then press Shift, click the cell in the second row, and release both the mouse button and the Shift key.
- The top two cells will be surrounded by a border, with the fill handle in the bottom right corner of the lower cell.
- Double-click on the fill handle, and the cells below will be filled in with an incrementing pattern: 1-2-3-4-5.
- A copied pattern of 1-2-1-2-1 may briefly be seen, but will be overridden by the incrementing pattern.
Table Actions
5. Fill Boxes by Row or Column
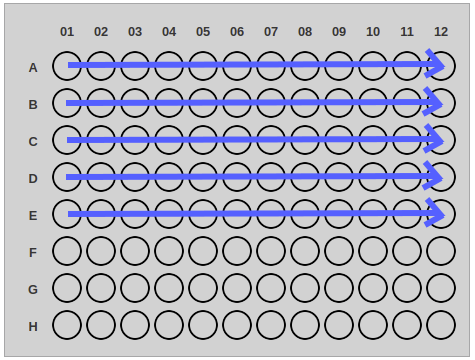
Samples, libraries, library aliquots, or pools can be bulk-added to a box from within the bulk tables pages. Selecting the Fill Boxes by Row option adds the tubes in the displayed order, going from left to right, and top to bottom (see Figure 1). Selecting the Fill Boxes by Column option adds the tubes in the displayed order from top to bottom, and left to right (see Figure 2).
 |
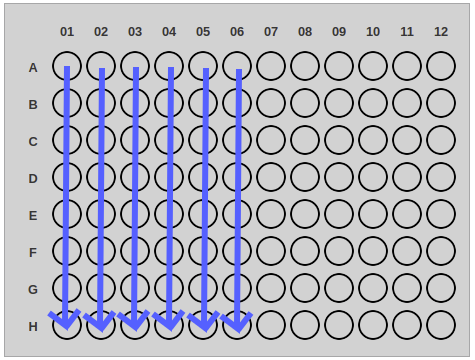 |
| Figure 1: The Fill Boxes by Row pattern | Figure 2: The Fill Boxes by Column pattern |
- Return to your Create Libraries bulk table.
- In the top row of the Box Search column, enter the alias of the box you created in the Working with Boxes tutorial
(it should be
XX Test Box, withXXbeing your initials). Once the top row of the Box Alias column displays a box alias value, fill down the Box Alias column. - Click Fill Boxes by Row.
- The Position column will be filled in. Note the pattern of the positions.
- Delete the value in the top row of the Position column. Fill down the rest of the Position column so that all cells are empty.
- Click Fill Boxes by Column.
- The Position column values will change. Note the new pattern of the positions.
6. Check QCs (Libraries only)
The Check QCs feature can be used to automatically update the QC Status column values based on the values in the Size (bp), Volume, or Conc. columns.
- Return to your Create Libraries bulk table.
- Ensure all QC Status cells are empty.
- In the top row, enter the following values:
- Size (bp): 300
- Volume: 10
- Conc.: 2
- In the second row, enter the following values:
- Size (bp): 301
- Volume: 11
- Conc.: 3
- Use the incrementing fill to fill in the Size (bp), Volume, and Conc. columns.
- Note that the Vol. Units column does not contain numbers and so cannot be incrementally filled down.
- Click Check QCs.
- In the Size section, select = from the dropdown menu and enter 303 into the input field.
- Leave the Volume and Concentration sections set to ignore.
- Click Check.
- Note that the QC Status values have changed.
- Click Check QCs.
- In the Volume section, select > from the dropdown menu and enter 10 into the input field.
- In the Concentration section, select <= from the dropdown menu and enter 4 into the input field.
- Leave the Size section set to ignore.
- Click Check.
- Note that the QC Status values have changed.
7. Export
The current state of the bulk table data can be exported at any time. Exports can be saved as Microsoft Excel, Open Document Format, or Comma-delimited Data (CSV) files.
- Return to your Create Libraries bulk table.
- Click Export at the top of the table.
- Select Microsoft Excel format.
- Click Export.
- The spreadsheet will begin downloading.
8. Import
A spreadsheet can be uploaded to a bulk table page, and any matching data from the spreadsheet will be entered in the table.
- In order to match, the spreadsheet column header must exactly match the bulk table column header.
- Spreadsheet upload will fail if:
- the spreadsheet contains columns whose headers don't match any headers in the bulk table
- the spreadsheet contains more rows than the bulk table does
- If the spreadsheet cells contain invalid data, the data will still be entered in the table.
- If the spreadsheet contains fewer columns than the table does, the table data for columns not in the spreadsheet will remain unchanged.
- Open the spreadsheet you downloaded in the Export section.
- Delete all columns to the right of the Sci. Name column.
- Enter text into some or all of the remaining cells.
- Save the spreadsheet.
- Return to your Create Libraries bulk table.
- Click Import.
- Choose the spreadsheet you edited, and click Import.
- The cell values of the columns from the spreadsheet will change.
- The cell values of the columns not present in the spreadsheet will be unaffected by the import.
Miscellaneous
9. Cell Colours
Some of the cells in a table can have different colours, each of which indicates a specific meaning:
- Red: cell needs to be filled with valid data (empty cell is invalid).
- Yellow: the value is valid, but you may want to double-check to ensure it is correct. For example, the value may be non-standard, or other options may be available.
10. Read-Only Cells
Read-only cells cannot be edited directly. They contain lighter text than cells you can interact with. For instance, the Sample Class cells will be read-only. The Name column will be automatically filled in after the item is created.
Sometimes, a read-only cell becomes editable once another cell has been changed.
- Return to your Create Libraries bulk table.
- Click the dropdown arrow in the Index 1 column for row 1.
- Nothing happens, as this cell is read-only.
- Select the following options in row 1:
- Platform:
Illumina - Index Kit:
Nextera DNA Dual Index
- Platform:
- Click the dropdown arrow in the Index 1 column for row 1 again.
- The cell is no longer read-only, so the dropdown opens and there are options to choose from.
11. Dependent Cells
Some cells change (dropdown items, required vs optional, read-only vs editable) according to the value of other cells. For instance, on the bulk Create Libraries and Edit Libraries pages:
- Selecting a Template (if available) will lock in values for some or all of Design, Code, Platform, Type, Index Kit, and Kit.
- Selecting a Design will lock in values for some or all of Code, Selection, Strategy.
- Changing Platform will affect the dropdown items for Type, Index Kit, and Kit.
- Changing Index Kit will affect the dropdown items for Index 1 and Index 2.
| < Working with Boxes | Home | Project Coordination > |