 MISO
MISOWorking with Boxes
1. Logging in
You need to log in to MISO LIMS in order to make changes to any LIMS entities. Logging in lets MISO record any changes you make on entities you have access to.
If you are a new user, you will need
to contact helpdesk@oicr.on.ca so that they put you into the appropriate
Active Directory group, MISO_ROLE_INTERNAL.
Try to log in now:
- Click on http://miso.gsi.oicr.on.ca.
- Enter your username (e.g. jdoe) and password and click the Login button.
MISO uses the same username and password as your OICR email account.
If all goes well, you should see the MISO Dashboard and see a message at the top right: "Logged in as: jdoe".
2. Creating Some Test Data
We are going to need some items to play with, so we will create a few pools:
- Go to the Library Aliquots page.
- Select any five library aliquots from the list.
- Click Pool Separately in the toolbar. DO NOT check the Create New Box option in the dialog. Click Create.
-
Enter the following attributes for the pools. Replace 'XX' with your own initials:
Pool Alias Matrix Barcode Volume Vol. Units XX_POOL_1 XX-A01 5 µL XX_POOL_2 XX-A02 5 µL XX_POOL_3 XX-A03 5 µL XX_POOL_4 XX-A04 5 µL XX_POOL_5 XX-A05 5 µL - Click Save at the top right.
3. Creating a Box
Create a box to use for the rest of this walkthrough:
- Go to the Boxes page.
- Click Add in the toolbar. In the dialog, set Quantity to
1and click Create. - Fill out the box information as follows.
- Alias:
XX Test Box(replaceXXwith your own initials) - Box Use: Choose any option.
- Box Size:
8x12 Storage (scannable)
- Alias:
- Click Save at the top right.
4. Selecting Positions
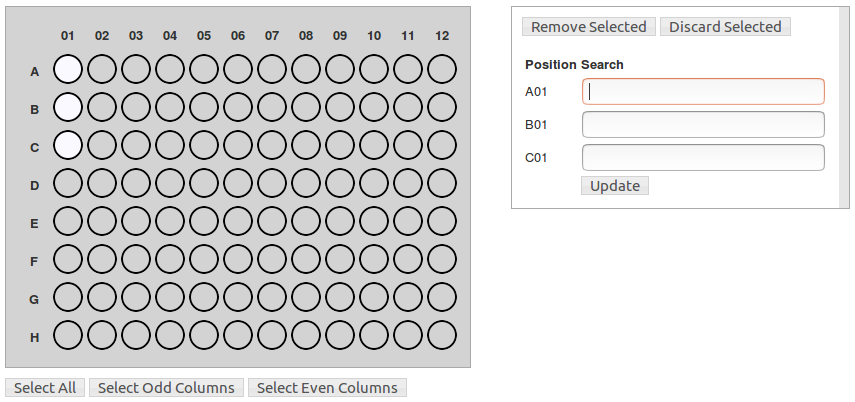
- On the Edit Box page, scroll down to the Contents section. You will see a diagram containing many circles. Each circle represents a position in the box. These are labelled with row letters and column numbers.
- Hover your mouse over one of the circles. It will display a tooltip showing the position name and what it contains. e.g. "B03: EMPTY"
- Click on any of the circles. It will be highlighted to indicate that it is selected. Additional controls for manipulating this position will appear on the page.
- Hold the Ctrl key on your keyboard (or Command on a Mac) and click another position. Now two positions are selected, and the additional controls will change to reflect this.
- Click one of the row labels - the letters on the left of the diagram. The entire row will be selected.
- Hold the Ctrl/Command key on your keyboard and click another row label. Now both rows are selected.
- Click one of the column labels - the numbers at the top of the diagram. The entire column will be selected.
- Below the diagram, click the Select All button. All positions will be selected.
- Click the Select Odd Columns button. Columns 1, 3, 5, 7, 9, and 11 will be selected. This (and the Select Even Columns option) can be especially useful when a robot is working on your samples and may do something such as creating libraries in the even-numbered columns from samples in the odd-numbered columns.
5. Adding individual items
- Select any single empty position in your box.
- In the Search box, type the barcode of your first pool -
XX-A01and click Lookup. - The name and alias of the pool will appear in the Results dropdown. Click Update Position to confirm and save the pool in the selected box position. The diagram is updated to show the selected position filled.
6. Replacing items
You can add an item to a position that already has an item. This will cause the existing item to be replaced. The existing item is removed from the box and its location is then unknown.
- Select the position where you have already added your pool.
- In the Search box, type the barcode of your last pool -
XX-A05and click Lookup. - The name and alias of the pool will appear in the Results dropdown. Click Update Position.
- A dialog will warn you about replacing the current item. Click Replace.
7. Adding multiple items
- Select any single empty position in your box.
- Hold the Ctrl/Command key and click 3 more empty positions. You should now have 4 positions selected.
- In the Position Search list, fill in the barcodes for your remaining pools -
XX-A01,XX-A02,XX-A03, andXX-A04 - Click Update. The diagram is updated to show the new pools you've added.
8. Removing an item
- Select any single position containing one of your pools.
- Click the Remove Item button. A warning appears, telling you that the item's position will be unknown. Click Remove to confirm.
9. Removing multiple items
- Select the rest of the filled positions.
- Click the Remove Selected button. Click Remove again in the warning dialog. The box should now be empty.
10. Filling the box by barcode pattern
The "Fill by Barcode Pattern" feature allows you to assign barcodes which indicate the box position that items should be stored in. In most cases, these will not be real barcodes, but will be fake ones assigned just for this purpose. This may be useful when creating items that are stored in plates, which will not usually have a barcode for each position.
- Ensure that your box is empty. If there are any items remaining in it, remove them as detailed in the previous exercise.
- From the Options menu in the Contents bar above the diagram, click Fill by Barcode Pattern.
- In the dialog, enter Prefix
XX-, replacingXXwith your own initials. - Select Standard suffixes. This means that the barcode pattern contains the name of
the position where the item should be stored. e.g. the item with barcode
XX-A01should be stored in positionA01. - Click Fill. Your pools are all added to the box in the positions specified in their barcodes.
11. Exporting to Excel
You can easily export a spreadsheet detailing a box and its contents:
- From the Options menu in the Contents bar, select Export Box to Excel.
- Open the downloaded file. It contains some box information at the top, followed by information about its contents below.
- Close the spreadsheet when you are done having a look.
12. Discarding an item
When you discard an item in MISO, several things happen:
- the item is removed from its box
- the item's volume is set to 0
- the item is marked as discarded
You can discard items from the Edit Box page:
- In the Contents diagram, select the item stored in position A01.
- Right-click on the item's name or alias and choose Open Link in New Tab.
- Select the new tab and note the Pool's volume. Note also that the discarded checkbox is not checked.
- Return to the other tab and click Discard Item. In the dialog, click Discard again to confirm. The item is removed from the box.
- Return again to the other tab and refresh the page. The pool's volume is now set to 0 and it is marked as discarded.
- Close this extra tab - the one showing the Edit Pool page. Return to the Edit Box tab.
13. Discarding multiple items
- In the Contents diagram, select the items in positions A02 and A03.
- Click Discard Selected. In the dialog, click Discard again to confirm. Both items are discarded at once and disappear from the box.
14. Discarding all items
To discard all remaining items in the box:
- From the Options menu in the Contents bar, select Discard All Contents. In the dialog, click Discard to confirm. All remaining items are discarded at once and disappear from the box.
| < Administration Tasks | Home | Working with Tables > |